Showing posts with label DIY. Show all posts

Friday, December 19, 2014

Holiday DIY: Pom-Pom Garland


Many times I find myself in situations where I just can't find exactly what I want when I go out looking for something. Stores sometimes just don't have what I want and that fact is never more apparent than when I'm looking for things to decorate my house. It's even more-so a problem at Christmas time. I am just not into pine cones, wicker wreaths, and cinnamon brooms. I like bright, obnoxious colors during the winter months as much as I do during the summer time, and because of this I find myself having to make things a lot of the time. This Christmas, I decided to make myself something that I've been wanting to make for a long time: a pom pom garland! Tinsel is too messy and regular garland is always one boring color, so why not make something fun and colorful for me to enjoy for many years to come! Today, I will tell you how to make your own pom pom garland with greatest of ease! Your supplies are a follows:

A Large Hand Sewing Needle
2-3 Yards of Knotting Cord (I used white)
Large Bag of Multi Size Pom Poms 


1. Pull out as much knotting cord as you need to make the length garland you want. Thread the cord through the needle and leave a bit of overhang so that the cord doesn't slip through while threading the pom poms. Tie off the end so pom poms won't slip off the end of the cord.


2. Pierce pom pom through the middle and pull all the way down to the end of your cord. I spaced my pom poms out at least 1.5-2 inches, but you can make a tightly spaced garland if you have lots and lots of pom poms.


3. Thread as many pom poms as it takes to fill up your cord. I like the look of spaced pom poms, but you can make a very tightly packed garland if you've got a lot of poms and a lot of time. Tie off the other end of your garland once you're done and wrap it around your tree!


If you have any left over, like I did, You can make some cute door hangs to go over doors ways to make them more festive!

This is a fun and easy way to make Christmas decorations that are all your own. Decorations that can be handed down for generations that have the story "mom made it" or "grandma made this" instead of "I bought this last minute at Target because there was nothing else". 

If you have some extra time or want an excuse to create some quiet time for yourself in this season of crazy stress, over-togetheredness, and an onslaught of face-to-face family time, get to work on your pom pom garland! Good tidings, all!


Wednesday, August 13, 2014

WTF, Emily: Where The Hell I've Been

I think it's safe to say that sometimes you just don't have the umph to go the extra mile. Sometimes you just want to be a lazy lump. That is where I've been the past few weeks (oops!). I had a week off from work, and even though I didn't go away on vacation, I spent my time doing stuff that I like to do. I stayed busy without having to worry about running myself ragged. At work, the week before my vacation was a scene straight out of Satan's butthole and all I wanted to do that first day off was crash and relax. I wanted my week off to be low-key and low-stress and it was! I took a few pictures so let's force you to look at those now!


We went on a ton of walks around our neighborhood.There are a bunch of hibiscus flowers blooming at the moment and I always take the time to stop in appreciate them. They make me feel like I'm some place tropical! The pink ones were in a small park on one of our walking routes and the flowers, I swear, were almost as big as my head. Hooray for freakishly big flowers!

I like that my city is old (too bad it's sinking). There's a lot of cool architecture and neat little places tucked into neighborhoods that you wouldn't see from the main roads. 

I went thrifting and found some cool records! This one is a compilation of all those songs that remind you of vintage Hawaiian news-reels and movies. I was worried that it wouldn't play, but I figured even if it didn't I could frame the cover. I got the soundtrack to South Pacific too which has a big ol' picture of Tahiti on it which is always a plus.

I ordered this book almost two months ago and Amazon finally got it in stock. It's a the "sequel" to the Surf Cafe Cookbook which is awesome. This one is more about the whole beachy lifestyle and includes ideas on decorating your house, creating a useable garden, and it also has a bunch of really good-looking recipes. Click HERE to get yours!

It was wonderful waking up later than 6:30in the morning, eating a good breakfast, getting some exercise and sunshine, and having a no-stress time with the BF. We even saw a sweet zipline park not far from us that we will probably frequent once the tourists get the heck out of here. I hope you all are enjoying your summer and denying that it will ever end. I watched The Endless Summer whilst doing my laundry and wished I lived in a place or had the ability to go to a warmer place in the colder months because last winter was the winter from Hell, but it just gives me something to look forward to in the future! Have a good week everyone!

Oh, and here's a picture of a praying mantis that landing on my windscreen and looks like a space monster attacking the city:
 All hail the Mantis!

Thursday, July 10, 2014

Healthy Snacks That Won't Make You Hate Everything

Being healthy is super good for you; I mean, it's the only way to really ensure you'll be rockin' and rollin' for a long time to come. The problem with being healthy is that with all the terrible stuff out that taste just so damn good, it's really difficult to be good when you're surrounded by demons all the time. I pass every fast food restaurant you could imagine, there are two donut shops close by that DELIVER, there are three ice cream establishments within a lazy walking distance, and Amazon Prime makes it possible for me to have cookies auto-shipped to my house twice a month. It's really easy to get off track, and I have a thousand times. My weak points are when I don't have a snack before lunch and that dangerous time before dinner when I'm as ravenous as a bunch of starved wolves. The key is healthy snacks. Healthy snack can keep a craving from turning into a 4500 calorie, open-gullet,  food dump. I demonzied snacks until I realized that I can't clean the same for room 25 times without replenishing the fuel supply. I have a little arsenal of healthy snack now to keep the fire burning before lunch, before my workout or before dinner!

1. Apple with Peanut Butter
Pinterest
Any apple, any low-sugar peanut butter. Done. It's great if peanut butter runs through your veins and want something a little healthier than crackers to eat it with. This is great in the fall when apples are in season and super cheap. this can also be made into a sandwich for a hefty-yet-healthy lunch.

2. Rice Cakes (With Toppings!!)
Pinterest
Rice cakes have gotten a bad wrap as a tasteless cardboard disk, but it's an edible plate full of possibilities! Rice cakes are the vessel upon which healthy dreams can occur! Herer are some of my favorite combos:
Plain rice cake, peanut butter, coconut flakes
White cheddar rice cake, hummus, red pepper strips
Popcorn rice cake, almond butter, blueberries

The possibilities are really endless! Stop throwing rice cakes to the curb and add something to them!

3. Tuna Salad
Pinterest
Get out of here mayonnaise! You're not invited to this tuna salad partay! Tuna salad is a versitile wonder fish that can go with all sorts of different mix-ins. Here are some good ones:
Greek Yogurt
Avocado
Red Onion
Green Onion
Hot Sauce
Spicy Mustard
Red Cabbage
Dried Cranberries
Diced Tomatoes

I reccommend axing the usual mayo and using Greek yogurt for extra protein and fewer calories. Eat it on some wheat crackers,on a rice cake (!!), or just plain out of your tupperware! Tuna has lots of protein and not a lot of carbs so it's a great snack!

4. Deviled Eggs
Pinterest
Deviled eggs are not just for cookouts and unwanted office parties. Eggs are eggcellent (hur hur!) sources of protein and keep you full and satisfied! Eggs are good for you, it's been proven over and over again, and these deviled eggs don't need mayo to make them delicious. Good things to mix in with your yolks are as follows:

Guacamole Eggs- egg yolk, mashed avocado, diced red onion, diced tomato, lime juice, cayenne pepper
Classic- egg yolk, spicy mustard, relish,salt, pepper, smoked paprika
Sinus Clearing- egg yolk, horseradish, sea salt, pepper, Parmesan cheese 

One or Two eggs are all you need to pump the energy levels back up and get back to doin' your thang!

All of these snack are easy to make ahead of time, travel well, and taste great. They are full of protein, fiber, and stuff that keeps your body happy and healthy. No celery sticks or baby carrots here, these are great for people who are looking to keep the muscle and hustle! Ok, enough with the stupid rhymes, try bringing these to work and school and see the difference in your energy level and ravenous end-of-the-day hunger! Eat up, everyone!

Friday, June 27, 2014

Renegades of Funk: Homemade Deodorant

I am a sweater and you better believe. I'll sweat because of anything: putting on lotion, sitting in a chair, carrying groceries, watching a tense movie, taking too hot of a shower. It really doesn't matter what season or what climate I'm in, I'm probably going to be sweating, which has led me to try about every goddamn deodorant under the sun. In the past, I was desperate to find the strongest, beefiest, sweat-annihilating deodorant known to man. It could have made me grow hair on the soles of my feet, but as long as it kept me from having any sort of moisture under my arms, I was prepared to try it. After a while of using store-bought and prescription strength antiperspirants, I noticed something. When I wore these ridiculous antiperspirants, I was sweating profusely everywhere else, and to tell you the truth, the stuff I was using wasn't doing that great of a job. I took a leap of faith, a shunned antiperspirant deodorant all together and took to using crystal deodorant, which was good for keeping me from being smelly. I like crystal deodorant, and if you want a deodorant totally free of antiperspirants, then I highly recommend it. But I needed a little more assurance, and that's when I discovered the magic formula. I found out that if you mix coconut oil, baking soda, arrowroot powder, and a few essential oils, that you got a pretty damn good deodorant out of that. Now, I am sharing the secret with you!


Ingredients:
1/4 cup Baking Soda
1/4 cup Arrowroot Powder
5 Tbsp Extra Virgin Coconut Oil
Your Favorite Scented Essential Oils (I used lemon, bergamot ,and ginger oils)

Step 1.) Melt your coconut oil in a double broiler, or as I use, a pot with an inch of water in the bottom with a glass bowl fitted over-top. Turn on medium heat and let the oil melt down. The coconut oil melts at 76 degrees Fahrenheit so it won't take long, in fact, you could melt it halfway and let the residual heat do the rest.
2.) Once your oil is melted, add your baking soda and arrowroot powder

3.) Stir the mixture until it's smooth with no lumps or bumps and remove the bowl from the heat. *IMPORTANT* You need to allow the mixture to cool before adding your oils. Putting essential oils in something that it too hot will destroy all the good stuff in the essential oils! So don't be impatient, or if you are impatient, put it in the fridge for about 10 minutes.

4.) Once your oils have cooled either on a counter or in the fridge,it's time to add your favorite fragrances. I added 7 drops of lemon oil, 4 drops of bergamot oil, and 3 drops of ginger oil.It ended up smelling like a lemon ginger cookie and it's freaking amazing! Use your favorite scent combo, or just use one!

5.) Transfer your mixture to a clean container, allow mixture to further cool and solidify, and you're finished! Your very own, homemade deodorant that cost you almost nothing that should last you as long, if not longer, than your traditional stick. To apply, just scoop about a half a teaspoons worth of the mixture and rub into your underarms until the oil gently melts into the skin.


I hope you try this cool and stupid-easy recipe that will free you from the shackles of commercial deodorant. Get a little more natural and play around with your favorite scents! One of my favorite places to get essentials oils is From Nature With Love, they've got a ton and also carry arrowroot powder and cute jars for packaging! Have a good weekend everyone!

Instagram @e_bythesea
Pinterest @ebythesea86

Monday, May 19, 2014

Sweet Brown: How To Get The Perfect Fake Tan. Every. Time.

Let me start out by saying this is a process; a commitment to being bronzed (not that paleness is bad!) that cannot be half-assed. If you are someone who is committed to staying sun-safe, but has a hard time living life in the pale-lane, than follow these steps to the perfect sunless tan. This method is tried and true by yours truly and friends and family can confirm that that tan looks real and in no way freakishly orange.

Ingredients For The Perfect Tan:
Tanning Mousse
Tanning Mitt
Rubber/Nitrile Gloves (in a size that fits your hand snugly!)
Exfoliating (Hammam) Mitt
Thick Moisturizer
A Cool, Dry Room To Apply Your Tan

ITEM 1
Long Live The Mousse:
I can honestly say that the only way to fake-tan is with a sunless tanning mousse. I have tried the gradual lotions, I have tried the funky brown lotions with a color-guide, I've done the sprays. The Mousse is top-dog for two reasons: 1.) It dries very quickly which keeps you from getting hot which can lead to tan-ruining sweat, and 2.) It allows you to use the ultimate tanning applicator: THE MITT (which I'll get to later). There are many mousses that I like, but I'll give you my absolute favorites:

St. Tropez Bronzing Mousse $42
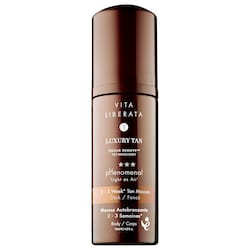
Vita Liberata pHenomenal 2-3 Week Tan Mousse $54
St. Moritz Instant Self Tanning Mousse $5

ITEM 2
The Mitt:
I used to think the tanning mitt was a waste of money. What better applicator than my gloved hands, right? WRONG. I pray at the alter of the tanning mitt and I will never turn back. It makes your applications totally flawless; it totally gets rid of any streakiness that can be cause by using your hands. Now, that doesn't mean you don't wear gloves because the tanner can soak through the mitt and deposit unwanted color on your fingers. Another mitt I recommend the committed tanner purchase is an exfoliating mitt or hammam glove. These gloves are used in Turkish spas by big burly dudes to scrub all you dead (and living) skin off your body leaving you dead-skin free! These are a little more economical than body scrubs which literally get washed down the drain when you're done with them. With the hammam glove, you get the same exfoliation or better without buying more body scrubs!
St. Moritz Tanning Mitt $5

Hammam Glove $20
THE PROCESS
Exfoliate and Shave:
Always exfoliate before you shave. It bristles up any hairs that may be a tad ingrown and makes for a smoother shave. Focus on feet, knees, and elbows which are notorious for being dry, but scrub the rest of your body too! After you exfoliate, shave any bits you want to shave and then give yourself a wash with some body wash in-case you use an oily shaving cream. You want your body devoid of excess moisture which can cause an uneven tan.

Dry Off and Moisturize:
Make sure you are completely dry before you moisturize and tan. If you need to leave your humid bathroom environment, DO IT. Once you are dry, put a thick, creamy moisturizer on the driest parts of your body that could possibly hold more tanner than necessary: toes/feet, ankles, knees, elbows, knuckles, the big five!

Glove-Up:
Always wear gloves when applying tanner or else your hands will look like you've colored them in with a brown Sharpie. I wear nitrile (non latex) disposable gloves from work in the appropriate size (small). Big, floppy gloves will only result in a very frustrating experience. Put your tanning mitt over your gloved hand and start with two pumps of your tanning mousse of choice. 

Tan Time:
Start at the feet and blend your tanner everywhere it needs to go. Work your way up the leg and so-forth. Once you get to the point where you need to tan your back, flip the applicator side of your mitt so that it sits on the top of your hand and swipe it across your back like you're trying to get at an itch. Switch the mitt to the other hand and do the same thing to get the places you couldn't get with the other hand. If you have a shoulder injury or can't move your arm that way, get someone to help you!

Post-Tanning:
No physical activity! Any sweat or excess water will jack up all your had work. Your best bet is to tan the night before you want to be bronze and let the tan develop overnight. Tanners will stain light-colored sheets so sleep on a towel or switch to some darker sheets ( I told you it's a process)! When you wake up, you'll be a bronze goddess! Many tanners recommend you shower off any color guides (brown residue) after your tan develops or else you'll get brown stains on your clothes. 

END RESULT: Enjoy Your Tan!
If you want a darker tan, apply more tanner the next morning and avoid any moisure-filled activites. I wasn't kidding when I said it was a process, but this is what I do. If you don't have this much time on your hands, go get a professional spray tan. If you don't have enough time for that, I'm out of ideas. When I explain my process to people, it's almost always overwhelming, but I want to be transparent as to how I achieve the best sunless tan I can get. Once you get the process down, it's not really a big deal and the benefits outweigh the hassle! 

If there are any other questions you may have about my process, leave a question in the comments section and I'll get right on it! I don't think fake tanning is a hassle; if I can still look tan without risking my health, I'm all for it! Forget the hours of sunbathing or money spent at a tanning salon and tan the safe way!

Instagram @e_bythesea
Twitter @e_bythesea
Pinterest @ebythesea86

Saturday, May 17, 2014

Breakfast of Champions: Banana Chia Overnight Oats

I have a new favorite breakfast. Now, breakfast for me only really needs three qualities: it's fast, it tastes good, and it's good for me. Overnight oats are not a new thing; bloggers have been throwing around the praises of overnight oats all over the internet, but every recipe I tried just lacked something. I think that something was simplicity; there was just too much crap in them. Canned pumpkin, almond butter, coconut oil, three different kinds of seeds. Enough already! This recipe is simple, delicious, and fast! You may even beat your coffee pot to the finish line!

The Ingredients:
1/2 Cup Old Fashion or Rolled Oats
1/2 Cup Unsweetened Almond Milk (or whatever milk you use)
1 Tablespoon Raw Chia Seeds
1 Tbsp Shredded Unsweetened Coconut
1 Banana
1 Tsp Honey (or agave if you're vegan)
1/8 Tsp Salt
1 Tsp Vanilla Extract


 Step One: In your bowl, mash your banana well with a fork. Add All the other ingredients to said bowl.

Mix all of your ingredients together, cover bowl with lid or plastic wrap, and stick it in the fridge overnight.

The final step: take it out of the fridge and eat it. It really doesn't get more simple than that! This recipe is loaded with fiber, slow digesting carbs (the good kind), and flavor to keep you from having to choke it down. It's health food you actually want to eat! I pair this with a cup of coffee and a big glass of water, eat it at 6:45 am and I'm good until my snack time at 10. If you're skipping breakfast because you have no time or are just a lazy lump, these overnight oats give you no excuse to  skimp on the most important meal of the day! Eat up, everyone!

PS- A giant, inflatable duck came to my city and I think I'm in love!


Instagram @ e_bythesea
Twitter @e_bythesea
Pinterest @ebythesea86
Poshmark @ebythesea

Friday, February 28, 2014

Feed My Face: Açaí Bowls


I'm all about trying new things for breakfast. I get sick of having the same stuff over and over again. Once, when I was probably 9 years old, I got really into Frosted Mini Wheats and ate them every morning and any other chance I got for probably the next two months. It was probably Kellogg's best quarter ever, but after that two months was up I never wanted to eat another Mini Wheat again. The same goes for Texas Toast and Swedish Fish, but that's another story. When the days start to get warmer, I shun my toast and oatmeal for something that is cooling and delicious. I used to just make a lot of smoothies, but I was looking for more. That's when I discovered the Açaí Bowl, or as my coworker and I call it "dessert chili". It was a smoothie, it was granola, it was healthy, all in one bowl. You can make it as simple or as complicated as you want to, but the basic concept is all the same. There's no "right" way to make an Açaí bowl, but here's a guideline as to what you can do to make a really good one!

Açaí Base
1 Package Sambazon Açaí unsweetened Smoothie Pack*
1/2 Frozen Banana
1/2 Cup chopped pineapple (pref. frozen)
1 Tbsp ground flaxseed
Approx. 1 Cup Coconut Water, milk, orange juice, whatever you desire

Blend together until smooth.

Topping Options
Granola (My favorite is Nature's Path Coconut Chia)
Unsweetened Shredded Coconut
Slivered Almonds
Crushed Macadamia nuts
Sliced Strawberries
Blueberries
Sliced Kiwi
Sliced banana
Mango Pieces
Bee Pollen (weird but gives a satisfying crunch)
Raw Honey
Agave (for the vegans)

*Now, if you don't want to shell out the bucks for special Açaí smoothie packs, you can buy the Sambazon Açaí that are almost always on sale at my local grocery store, freeze them in an ice cube tray and use three of those per bowl you're making. Can't find any Açaí where you are? Substitute it for a frozen berry mix. If I can't find frozen Açaí or nothing's on sale, I get a blueberry, raspberry, blackberry, cherry medley and it works really well. Açaí is so popular because of all the antioxidants it packs in; try and get the real stuff if you can, but berry mixes are just as good. Another option if you can't find acai is Pitaya (dragon fruit); it tastes super good, has a fabulous fuschia color, and is really good for you. You can purchase pitaya smoothie packs here!

These bowls are great for breakfast, lunch, dinner, and every meal in between and if you have everything prepped beforehand they can be made pretty quickly. They have quickly become my favorite way to start the day. Açaí bowls have been popping up in shops all over the place, but get adventurous and make your own at home!


Photo: Tumblr


Instagram @e_bythesea
Pinterest @ebythesea86

Monday, February 10, 2014

Ramblin': What's Going On!


I've been very unmotivated lately. I feel as though I have nothing of substance to write about and I blame it on the weather! Gray skies, snow, clouds, wind; it's enough to make me want to pack up and move to Florida even though Florida is a whole new category of crazy complete with alligators (sorry, Florida).  I have this week off since my boss is jetting of to the British Virgin Islands and shutting down the office (WELL GOOOOOD FOR HIM) and I'm trying to do lots of stuff that I can post about. I've got a couple of new products that I'm really liking and I plan on doing some reviews for those, but right now I'm just in the furious brainstorming phase. I apologize for the lack of content, but there's always a sort of lull between seasons when it come to writing inspiration. The spring stuff is just starting to come out in stores now, so I'll have more to write about once I can get my little hands on it! Until then, enjoy this recipe for an awesome "Don't Feel Too Guilty" about it Cookie Dough Dip! It's made with chickpeas and peanut butter and it's friggin' amazing!

Photo: Chocolate Covered Katie
 Check out Chocolate Covered Katie's Cookie Dough Dip recipe. Unlike a tube of Pillsbury, it won't make you feel like you're going to die afterwards! I will be back with more content everyone, but until then stay warm!


Thursday, December 26, 2013

Surviving the Duldrums: Post-Holiday Projects!

I hate to start out this post all gushy-like, but I have the best boyfriend ever. He got me a beautiful sewing machine for Christmas that I can't wait to start making fun stuff with!

Exhibit A: Dope-ass sewing machine
Now that I can get all crafty, I'm thinking of all the ways I can put this thing to use. I always tend to associate the months before spring/summer with the most BORING time of the year: it's friggin' cold, there are no work holidays, no birthdays. It's just that irritatingly long stretch before the real fun begins. Since I don't want three months of the year being wasted on yearning for summer, I'm going to get cracking on some cool DIY sewing projects!

My first endeavor is going to make myself a surfboard bag. I'm sick of trying to coordinate my towels to stay on my seats so that I don't end up with waxy bits on my headrests. I figure I can make a surfboard bag pretty easily out of some stretch terry cloth and a shoe lace for a cinched closure.

I found a bunch of DIY's on Pinterest so I hope once I get all my sewing accessories sorted out, I can get started!

I also want to start making my own swimsuits; just a few simple designs to start with and maybe try and make a cool monokini or fringe top. Because of my gigantic butt, I have a problem finding bottoms that don't dig in or give me enough coverage ( tired of flashing my coinslot), so creating my very own swimwear might be a way to circumvent all of my big-butt problems. 

Love this project from Goldfish Kiss
There are sooooo many fun projects that are just a sewing machine away from filling up a bunch of cold, rainy days. I can't wait to get going and have already been scouring the internet for cool fabrics. Hope you all had a nice Christmas/time off work because of Christmas. Whatever you did over the past week, I hope it was enjoyable. Until next time, adios amigos!

Monday, December 23, 2013

Absolute Last Minute Gifts: Edibles and DIY!!

If you are still sitting on your ass, stressing about all the shopping you didn't get to do, there are still some things that can be done that will produce gifts that won't look rushed or impersonal. You may even be able to use things around the house, or be able to pick these items up at your local grocery, drug store, or Dollar Store. You really can make a DIY gift that won't disappoint like all those macaroni necklaces your mom threw away decades ago. Here are some Pinterest ideas that people will actually want!

1. Paint-Dipped Bamboo Utensils
This is a pretty cool present for the chef in your family, for new homeowners, college kids, or someone who needs to learn how to feed themselves. Bamboo utensils like the ones above can be bought at your local grocery or dollar store. Just tape off where you want the paint line to end and either use some old house paint or use left over spray paint. Customize to match the utensils to the recipients kitchen. Super cute and easy!

2. Homemade Art Work
Pinterest
Pinterest
It doesn't get much easier than getting a cheap canvas at a local art store, taping off some shapes and painting the whole canvas. Once you lift up the masking tape, you'll be left with some cool, modern-looking, geometric art that can be color-customized to fit your friend of family members home decor. The bottom piece is a canvas that was painted one color, then half was painted over with another and just dry-brushed over the mid-line to create a cool softer edge. I think both projects look really cool and I even have my own tape-off art up in various places in my house. All it needs in the end is a signature!

3. Holiday Food Treats
Photo: Closet Cooking

Photo: Food52
Food is always a crowd pleaser. No matter how much someone tells you they don't want sweets around the holidays, they're just one shitty January workday away from wanting to eat their feelings with reckless abandon! Stick to the basics to make sure it'll go down well. My FVAORITE COOKIES EVER are Cherry Chocolate Chip Cookies and my favorite non-cookie holiday item is peppermint bark. Both are stupid easy to make and will either make a good gift for a foodie friend or acts as a good last-minute filer gift when you feel like you haven't gotten enough for a certain someone. Put it in a cool reusable tin and you've given a gift that keeps on giving!

4. Homemade Bath Products
Photo: Hey Gorgeous
Photo: idlewife
Bath products don't need to be fancy brand in order to be a good gift. Most people will be blown away and think you're some sort of evil genius if you can handcraft them some sort or bath product. The easiest ones to make a body scrubs and bath fizzies. Body Scrubs only need a few ingredients: Sugar/salt, essential oil of your choice, heavier carrier oil, and a jar. THAT'S IT. Bath fizzies really only need Epsom salts, cornstrarch, baking soda, essential oil and a mold. Click HERE for a good bath fizzy recipe that made the cute little disks above and here are a few of my own body scrub recipes to impress your friends!

Margarita Salt Scrub:
1 1/2 Cup Fine Sea Salt 
1 1/2 tsp. Lime essential oil
3-4 Tablespoons Grapeseed oil*

Warm Lemon Sugar Scrub
1 1/2 Cup Fine Brown sugar
1 1/2 tsp Lemon essential oil
2 Tsp Lemon juice
zest of 1/2 lemon
3-4 Tablespoons grapeseed oil*

I use grapeseed oil because it is light, unscented, and can be found at the grocery store. Sweet almond oil is also a good choice, but steer clear from heavier and scented oils like Olive or vegetable/canola. Avocado would be acceptable too.
 * If you want a sudsy scrub and not an oily one, replace the grapeseed oil with unscented castile soap (Like Dr. Bronner's)
Adjust the grapeseed oil/castile soap to get the desired consistency!

5. Friendship Bracelets
Pinterest
Photo: Henry Happened

You know you cranked out thousands of bracelets at summer camp, so why not jump back on the bandwagon in your time of deep desperation. Friendship/diy-esque bracelets are all the rage now, so capitalize on your craftiness and make your friends some cool jewelry if you're stuck with little resources. Visit your local craft store or repurpose an old fake pearl necklace you haven't worn since your sorority formal and make some cool stackable bracelets. Hemp and black/freshwater pearl bracelets look cool an beachy; you can even use thick cords and hex nuts braided together to make a cool metal- accented piece. The possibilities are endless!

Well I hope this helps some of you super late shoppers that don't feel like killing themeselves at the mall all day tomorrow, or just worrying about the sincerity of your gifts. Homemade stuff may sound lame, but you put your time, creativity, and hard-earned cash into to hand-make a special gift for a special person. Enjoy and get crafty!

Sunday, December 8, 2013

Nailed it!: Stocking Stuffers

Stocking Stuffers

Stocking Stuffers by elbonner featuring ncLA

Stocking stuffers are always fun at Christmastime. Making things like tissues and nail clippers glittery and christmasy are a great way to make boring stuff way exciting to receive. Now, if you want to outdo everyone else's nail files, lottery tickets,  and Chili's gift cards, give them some really cool nail art! There are a bunch of drugstore brands that make cool nail wraps, but my favorite come from NCLA. They are a little bit more expensive, but they have really cool patterns, colors, and themes. Wear them to holiday parties, or save them for a rainy day; I can't get enough of these nail wraps! Give yourself or your friends the gift of dope nails this holiday!

ncLA